Zizania palustris or Northern wild rice, an an...
Thanksgiving time can be difficult for those eating gluten free.  Many of the trraditional dished served contain gluten and MSG.  One of the traditional dishes I really like is stuffing.  I have used gluten free bread to make bread cubes, but have never been really satisfied with them.  This year I came up with a bread recipe that has been usable in many recipes (see my Almond bread recipe).  I use this bread to make bread cubes for this recipe.  Everyone who had it, loved it. Now you can too, in time for Christmas.


6-8 slices gluten free almond bread
1 stick +2 TBSP  butter
2.C  gluten free chicken stock
1  onion, diced
2 ribs celery, diced
2 carrots, peeled and diced,
1 C. mushrooms, diced
1 C. wild rice
1 C. brown rice
6-7 sprigs sage
Salt and pepper to taste

Cook brown and wild rice according to directions.  Saute vegetables in 2 TBSP of butter until soft.  In a large bowl mix together cubed bread, sauteed vegetables, chicken stock, rice, and spices to taste.  Transfer to a baking dish and bake at 350 for 30-40 minutes.


Reblog this post [with Zemanta]


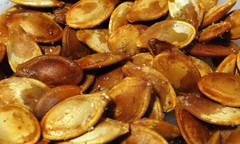
Roasted Pumpkin Seeds
Image by abbyladybug via Flickr
Harvest time brings with it many activities, raking, cleaning up the yard, walks in the crisp air, and baking. Pumpkins are one garden plant that provides a variety of foods. The obvious is pumpkin puree, but there are also pumpkin seeds that can be used. I love the wonderful crunch of roasted pumpkin seeds. These are really easy to make and are a much healthier snack that chips or crackers.


Scrape out the seeds and pulp from a pumpkin, transfer to a strainer/colander and rinse until the majority of the pulp is gone. Spread seeds out on a cookie sheet and let dry completely, about 24-48 hours. When completely dry, coat with a small amount of olive oil and sprinkle with salt to taste. Bake at 325 for 30 minutes (until crispy and slightly browned), stirring every 10 minutes. Let cool completely, then store in an air tight container.


Spicy Sweet variation:

2 C. Pumpkin seeds
2 TBSP Chili powder
2 TBSP Sugar
1 1/2 TBSP Salt
1 TBSP Cocoa powder
1 1/2 TBSP Olive oil

Reblog this post [with Zemanta]


Sugar pumpkins

Image by anslatadams via Flickr


I consider myself a novice when it comes to gardening, and last year I decided to grow sugar pumpkins so I could make pumpkin pies and bars with pumpkins I grew. So, being a beginner, I planted as many seeds as I could. The result was a bumper crop of pumpkins! I couldn't bear the thought of all my hard work going to waste, so I had to quickly figure out how to preserve all those pumpkins. It came down to 2 choices, I could can or freeze pumpkin puree. I did not want to spend the time it requires to can the pumpkins, so I chose to make the puree and then freeze it. It is really simple.


Preheat oven to 350.
Wash the outside of the pumpkin. Cut into quarters and clean the seeds and stringy pulp out (keep seeds for roasted pumpkin seeds). Then cut the quarters into chunks, lay skin side up and roast for 45-50 minutes, until the flesh is tender.

Cool the pumpkin until easy to handle. Scrape skins off and puree in a food processor until smooth. Allow to cool completely then transfer in to plastic freezer bags. I like to measure it as I bag it up. I like to put 1 C. in each bag. Label the bags with the date and use within a year for the best flavor.

>


Sea salt and peppercorns.Image via Wikipedia

Living a gluten and MSG life style can have its challenges. I have found the easiest way to avoid hidden ingredients is to make things myself. I make Season Salt myself because most brands list natural flavorings on the ingredients. One can never know for sure what these "natural flavors" include, so I find it is the best practice to avoid these as well. Here is my Season Salt recipe.

2 TBSP Salt
2 tsp. Sugar
1/2 tsp Paprika (from home grown dried peppers)
1/4 tsp. Turmeric
1/4 tsp. Onion powder
1/4 tsp. Garlic powder ( I make my own)
1/4 tsp. GF cornstarch


Combine all ingredients in an air tight container (preferably glass). Store in cool, dark place.


Tis the season for a multitude of traditions and traditional foods. One of my faorites at this time of year is Chex mix. I have fond memories of my dad cooking up a batch of chex mix on a cold Saturday sometime between Thanksgiving and Christmas. The aromas waifting through the house was wonderful. The batch of chex mix never made it to the New Year. Since switching to a gluten free lifestyle I have had to make some adaptations to some of my favorite foods. Thankfully, this was one of the simpler recipes to adapt to a gluten free lifestyle. Chex makes several varieties of chex which are gluten free. Glutino makes a nice honeynut O cereal that blends well with the saltiness of the rest of the mix. There are also several brands of gluten free pretzles to use as well. I also make my own season salt because I am sensitive to MSG as well.

In a large raoster combine:

1 box Rice Chex
1 box Corn Chex
1 box GF O's (I like Glutino's)
2# Mixed nuts ( check ingredients to make sure nothing is added)
1 bag GF pretzles

In a pot, melt 1 pound butter.


Add:
1 TBSP Paprika
1 tsp Garlic Salt
1 tsp. Chili podwer
2 TBSP Worchestershire sauce ( check ingredients, some have wheat)
1 tsp. Season salt (I make my own)

Pour sauce over mix and stir. Bake at 225 for 2 hours. Stir mix every 30 minutes adding garlic salt and season salt at each stirring. Cool and put into air tight containers.
Reblog this post [with Zemanta]


Here is a recipe for cream cheese frosting that is just the right amount of sweetness that will blend well with most desserts.


8 oz. Cream cheese (softened)
1 Stick Butter (softened)
2 tsp. vanilla
2 C. Powdered sugar


One of my favorite times of year is fall, with all the beautiful colors of the trees, crisp fresh air, and the garden harvest on my counter. As I sat looking at the bounty from our garden harvest, all the squash and pumpkins sitting on the counter called me to use them before they go bad. I find that pumpkin bars are one of falls traditional comfort foods. The smell of so many aromatic spices baking, warms the mind and soul. The smell of cinnamon reminds me of sitting in my grandparents kitchen, playing cards with the whole family, while pies and bars baked in the oven; some of my most treasured moments in life.
Last year, in my quest to be self sufficient, I learned how to make my own pumpkin puree. It tastes so much better than the store bought canned puree. So I set out on the task of making a pumpkin bar that was gluten free with all the pumpkin puree I had available. Her is what I came up with.

4 Eggs (room temperature)
1C. Butter(softened)
3/4 C. Sugar
3/4 C. Brown sugar
1/2 C. White rice flour
1/2 C. Sweet sorghum flour
1/2 C. Cornstarch
1/4 C. Tapioca flour
1/4 C. Potato flour
2 TBSP Baking powder
1 tsp. Baking soda
2 tsp. Xanthan gum
1 tsp. Salt
2 tsp. Cinnamon
2 tsp. Vanilla
1/8 tsp. Nutmeg
1/8 tsp. Cloves
1/8 tsp. Allspice
1/8 tsp. Ginger
2 C. pumpkin puree
1/3 C. Pecans, chopped
1/3 C. Raisins (optional)


Preheat oven to 350.
Grease and flour a 9"x13" pan, set aside.
Cream the butter, sugar, and eggs until fluffy. In a separate bowl, combine all the dry ingredients. Add the dry ingredients to the butter mixture and mix until well blended. Add in the pumpkin puree, nuts, and raisins. Mix for about 1 minute. Pour into prepared pan and bake for 30-35 minutes, or until a toothpick inserted comes out clean.
You can eat it plain like this or make a frosting for it. I made a cream cheese frosting for mine. Here is the recipe I used for the frosting.


Photo by: Johannes Pribyl
Living a MSG and gluten free life is definitely rewarding, being able to actually feel a physical improvement in your body by removing something that appears so benign - what a surprise! Makes you wonder what else there is in our food that might be causing problems - or even harm - in our bodies.
It can be an extremely challenging lifestyle choice as well. The one thing that has been hard to accept is that you will eventually find yourself making most things from scratch to insure there are no "hidden" ingredients.

One place where hidden ingredients tend to lurk quite often is in the seasonings you use. One example being Lowry's Season Salt which list "natural flavorings"as one of the ingredients. One of the natural flavorings is chicken bouillon. Most bouillon products have MSG in them. Since we don't know for certain if theirs does, it is much safer to make our own.

Truth in labeling

I have a simple recipe for Lemon pepper seasoning that you make as you need.


1-2 TBSP oil
juice of 1 lemon
Pepper to your liking

In a bowl combine ingredients and brush onto fish or chicken and then bake or pan fry as desired.


Notes: I usually use grapeseed oil as it is nearly flavorless and is a healthier oil than olive oil. You could also use coconut oil, but since it is a solid at room temperatures, it will form more of a rub than a glaze.


1 C. Pecan pieces, chopped
2/3 C. Dark brown sugar, tightly packed
1/4 Pound Unsalted Butter
1/2 C. Light Corn Syrup
1/3 C. Sweet White Rice Flour
1/3 C. Tapioca Flour

Preheat the oven to 325 degrees F.

Heat the brown sugar, butter, and light corn syrup in a medium saucepan over medium heat. Bring just to a rolling boil, then immediately remove from heat.

Add the chopped pecans, sweet white rice flour, and tapioca flour, use a rubber spatula to thoroughly combine.

To make tuilles, pour 2 tsp of batter per tuile on to a parchment lined stoneware baking sheet*, and only 2 per baking sheet. The batter will spread to make sure they are spaced well apart. Bake the tuiles one baking sheet at a time, on the center rack. Bake for 6 - 10 minutes, until evenly caramel in color.

Remove the tuiles from the oven and allow to cool for 30 seconds before handling. If you are using a stone ware baking sheet as recommended, remove parchment paper from stoneware to cool tuiles. Use a small spatula to lift the tuiles from the baking sheet. Roll each tuile around a wooden dowel, we find the rolling pin for sugar paste flowers works well, and allow to cool for 5 minutes before removing the dowel.

Bake the second sheet of tuiles and repeat the cooling and rolling until all the batter is used. Set aside to cool completely.


These tuiles can be eaten plain, like cookies or filled with whip cream, mousse, or cream cheese.


My husband made the best wheat baking powder biscuits, so we have been challenged with finding a recipe that is gluten free that would be an equivalent treat. This comes very close. We are going to keep modifying and seeing if we can make them even flakier, so keep checking back for version 2.0!


1 1/2 C. Sweet White Rice Flour
1 1/2 C. Tapioca Flour
1 C. Brown Rice Flour
2 TBSP Xanthan Gum
2 TBSP Baking Powder
1 tsp. Baking Soda
1 TBSP Salt
2 C. Milk (estimate, amount will need adjustment)
1 Stick Butter (refrigerated)


Instructions:
Preheat oven to 400 degrees Fahrenheit.
Combine all dry ingredients thoroughly before cutting butter into the dough. Butter should be cut into dough until pieces are even distributed but still identifiable - very coarse grain to dough.
Add one cup of milk and combine until dough is evenly moist\dry, it should be very crumbly at this point. Continue adding milk until dough forms a moist (but not tacky) ball. The amount of milk will need to be adjusted for humidity, altitude, etc. depending on your environment.
If the dough is too moist add additional tapioca (or corn) starch, as adding more rice flour will give the biscuits a slightly sticky (or tough) feel when eaten.
Grease a jelly roll pan including edges (a cookie sheet can be used but the outside biscuits will be drier).
Roll dough out to an even 1/2 to 3/4 inch thick, you do not want to make them too thin as they will be tough and dry. Cut into pieces, ideally 2.5 inches on a side if making square, or 3 inches in diameter for round.
Place biscuits onto pan touching as much as possible on edges to help retain moisture. Bake for 12 - 15 minutes (or until just golden brown on the top edges).
Makes approx. 24 biscuits.


Since I am very sensitive to MSG, I have been trying to find a recipe for Ranch style dressing that has no MSG or free glutamates in it. I think I finally found a recipe that is both safe for me to eat and delicious.

1C. Buttermilk ( I used my homemade buttermilk)
1C. Whole milk yogurt ( also my homemade)
1C. GF Mayo ( next time I will try homemade)
1 Tbsp Lemon Juice
1 tsp. Dried Dill*
1 tsp. Dried Oregano Leaf*
1 tsp. Garlic Powder*
1 tsp. salt
Cracked pepper to taste ( I like a lot in mine)

Combine all ingredients and refrigerate for several hours to blend the flavors. Use with in 7 days.
*Organically home grown, or Locally Sourced, is best, watch commercially processed as they may contain unwnated additives (including free glutamates!)