BBQ SauceImage by pirate johnny via Flickr
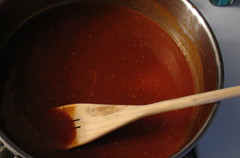
I was shocked to find that a lot of commercially made BBQ sauceshave wheat in them.  In my opinion, it is only there as a filler.  If you want thicker BBQ sauce, all you need to do it reduce it longer.  Adding wheat is totally unnecessary.
Another ingredient you have to watch out for in some BBQ sauce is soy sauce.  Not only is soy sauce made with wheat, it also contains free glutamates(MSG).  If you like the flavor of soy sauce, a good relacement is wheat free tamari.  To the best of my knowledge, this is free of glutamates as well. 
The third ingredient to watch out for is Worchestershire sauce.  If they do not list the ingredients of the worchestershire sauce, I wouldn't use it.  Some worchestershire sauce use wheat and some use soy sauce.  Once again, to the best of my knowledge, Lea Perrins, uses neither.  So why go through all the guessing games. Just make your own.  It is easy and quick, and taste just as good, if not better.  Here is the recipe I used last night on ribs.  I( goit rave reviews.

1/2 C. butter
2 C. Ketchup
1/2 C. brown sugar
2 tsp. garlic salt ( home made 50/50 salt and garlic powder)
1/4 tsp. cayenne, ground
1 onion finely minced
2 TBSP lemon juice
2 tsp. season salt (MSG Free version)
1 tsp. dry mustard
2 tsp. prepared mustard
1/4 C. Worchestershire sauce ( make sure it has no wheat or soy sauce)


Mix all ingredients together in a saucepan and bring to boil.  Simmer for 15 minutes or until it reaches desired thickness. Use on ribs or chicken.


Reblog this post [with Zemanta]


Cranberries, the state fruit of WisconsinImage via Wikipedia
My husband loves bread pudding.  I love making things my husband likes.  Gluten free and bread does not always mesh well, especially with breads.  My whole fmaily loves my almond bread, so I thought I would give it a try in a bread pudding recipe.  I found one that I thought I would like and modified it to be gluten free.  It came from Emeril.  Instead of french bread, I used my almond bread and in the cranberry compote, I did not use any of the lemon or orange rind.  I personally think they make any recipe a bit on the bitter side.  I didn't miss not having them in this recipe.  We also tried his Bourbon spiced cream and found just normal whip cream with vanilla went better with the pudding.

4 large eggs
1 C. brown sugar, packed
1/2 tsp. cinnamon
1/8 tsp. nutmeg, ground fresh
1 tsp. vanilla
2 C. cranberry compote (see below)
1 C. pecans, taosted and roughly chopped
2C. half and half
8 slices of gluten free almond bread, cubed
Whipped cream

Cranberry Compote:
1/2 pounds fresh cranberries ( approximatewly 2-3 C.)
1/4 C. orange juice
3 TBSP lemon juice
1/2 C. sugar
1 tsp. vanilla
2 C. water
3 TBSP cornstarch

For the compote:  Put all the ingredients except the cornstartch and 1/2 C. water in a sauce pan.  Over medium high heat, bring  to a boil.  Cook for 8 minutes.  Dissolve the cornstarch in the remaining 1/2 C. water and add the the sauce pan. Reduce heat to medium and stir constantly until mixture thickens, about 2 minutes.  Remove from heat and cool completely.


Preheat oven to 350 degrees. Grease a casserole pan with coconut oil( butter if you do not have coconut oil). Whisk together eggs, sugar, cinnamon, nutmeg, vanilla, and cranberry compote until very smooth.  Stir in half and half , bread cubes, and pecans.  Let it sit for 30 minutes for the bread to absorb the liquid.  Stir occassionally.  Pour mixture in to casserole pan and bake until the pudding is set in the center, approximately 55 minutes.  Let it cool for 5 minutes.
To serve, cut into 1" thick slices and top woith whipped cream.
Reblog this post [with Zemanta]


Eggs Benedict
Image by matthewf01 via Flickr
Breakfast for someone who is gluten free can be a bit of a challenge.  Many of the traditional, pastry like breakfasts are loaded with gluten.  My husband is a fan of Eggs Benedict. Since I had some almond dinner rolls left over,we decided to try making Eggs Benedict using these.  It turned out wonderful.

6 almond bread rolls, sliced in half
6 slices uncured ham (preferably no nitrites or nitrates)
6 eggs, cooked over easy (you can poach if you feel like it)
Hollandaise sauce:
3 egg yolks
1/8 tsp salt, optional
dash white pepper
4 tsp. lemon juice
1/2C. butter, melted

Make the Hollandaise sauce first by combining egg yolks, salt, pepper, and lemon juice in a blender..  In a small sauce pan, melt the butter.  Slowly pour the butter into the blender while on low.  Blend just until smooth and thickened.
Cook the eggs over easy and you can heat up the ham if you wish.  Assemble the Eggs Benedict with the ham first, then the eggs and then drizzle the Hollandaise sauce over the top and enjoy.
Reblog this post [with Zemanta]


I found myself with a large amount of raw milk that I needed to use in a hurry.  My kids were also asking for sandwiches and we had no bread.  I decided to try converting my Almond Bread recipe to one that used milk.  I doubled the recipe so I could also make dinner rolls to go with our split pea soup later on.  I found that doubling the reicpe works out well.
  Since I needed some warm liquid to activate the yeast, I warmed the milk enough to be luke warm (still mainatining its raw status) and also melted the butter in at the same time.  The dough looked very much the same as in the original recipe after mixing, so I had hopes it would work as well as the original.  When the first rise cycle was almost complete, my daughter walked passed the bowl and said it had filled it to the top.  I was amazed at how much it had risen.  I was a little concerned that maybe the bread would be holey since it rose so much.
  I poured half of the dough into a greased bread pan and the rest I dropped by spoon onto a cookie sheet.  I have found that if I use a little water on my hands, I can smooth and shape the dough after I have dropped it on the cookie sheet (dough is too wet to roll into a ball in your hand).  I think this recipe worked out better than the original.


1 C Tapioca flour
1/2 C. Cornstarch
1 C. Almond meal
1/2 C. Sweet sorghum flour
2 3/4 tsp Xanthan gum
3 Eggs
2 T Brown sugar
3 T Butter
1 tsp Apple cider vinegar
1 1/4C Milk, warmed to luke warm
2 3/4 tsp. Yeast

In a small sauce pan, heat up milk and butter until luke warm.  Set aside. In a miking bowl, mix all dry ingredients together.  Add yeast to the warm milk and butter.  Set aside for a few minutes, until yeast blooms.  Add yeast mixture, eggs, and apple cider vinegar to the dry ingredients and mix for 5 minutes.  Scrape down sides with a spatula, cover with a moist towel and leave to rise for 1 hour.  After the first rise, punch down the dough with a spatula and pour into a bread pan our spoon onto a cookie sheet.  Let rise for 30 minutes if making rolls or 45 minutes if making bread.  Bake at 350 degrees for 25 minutes for rolls or 55 minutes for bread.  Turn out onto a cooling rack until completely cooled.  Enjoy!
Reblog this post [with Zemanta]


Vanilla beansImage via Wikipedia
My husband grew up with his mother making this recipe for him.  It brings back fond memories for him.  He has helped me learn to make it, so that we can pass similar memories on to our kids.  My youngest can't get enough of it. This recipe makes a more custard like rice pudding than the typical recipe would make. A wonderful, healthy treat for a cold winter day.

2-3 C. Rice, mostly cooked
3 C. Milk ( you can use coconut milk to give it a bit of a tropical twist)
3 Eggs
2/3 C. Sugar
1 tsp. Vanilla
1 to 11/2 C. Raisins
1/4 tsp. Nutmeg (freshly ground gives the best flavor)

Put cooked rice into a baking dish. Combine the milk, eggs, sugar, and vanilla and pour over the rice.  Add the raisin and nutmeg.  Bake at 350 degrees for 1-1/2 hours, until the it has set up like a custard.  Serve warm with a bit of cream, or you can enjoy it just as much cold.
Reblog this post [with Zemanta]


Mint leaves.
Image via Wikipedia
When I first began my gluten free journey, I bought a lot of bagged gluten free flour mixes.  I never have found one that I like.  I also bought some flours separately.  One of the flours I bought because of it high fiber and nutritiousness, was coconut flour.  It is an interesting flour to work with.  Since it has high fiber, it soaks up the moisture in a recipe and you must adjust accordingly.  It is recommended to only use 20% of the flour in a recipe as coconut flour and to add equal amount of moisture back in.  This can make converting a conventional recipe difficult and not always with the desired results.  On the package of coconut flour, which I get from Tropical Traditions,(if you order from them please use this number as your referral, 5786495 to receive a free gift ) there is a recipe for fudge brownies.  It is an o.k. recipe, but for me too rich and heavy.  I personally like a bit lighter brownie.  So, I experimented by reducing the amount of coconut flour they recommend and replacing it with almond meal and sweet white rice flour.  I also was in the mood for a more festive, winter like flavor, so I added in some dark chocolate mint chips.  This brownie is the perfect match to a hot cup of hot chocolate or coffee on a crisp winter day.


1C. Butter
2C . Brown sugar
8 oz. semi sweet(70% cocoa) chocolate chips
2 TBSP Brown rice syrup or honey
4 TBSP Unsweetened cocoa powder
4 Eggs
2 tsp. Vanilla
1/2 C. Coconut flour
1/2 C. Almond meal
1/2 C. Sweet rice flour
1 tsp. Baking powder
1/4 C. Cream
4 oz. Mint chocolate chips


Preheat oven to 350 degrees.  Grease and dust an 11" x8" pan with coconut oil and cocoa powder.
Place butter, sugar, chocolate, and brown rice syrup into a medium sized saucepan and melt on low heat, stirring until everything is well blended and smooth.  Sift in the cocoa powder.  Remove from heat and set aside to cool.  Beat the eggs and vanilla together until frothy.  Then on low speed mix in the cooled chocolate mixture.  Next, add in the flours, cream, and baking powder, beating mixture after each addition.  Add mint chips until well blended.
Pour the mixture into the prepared pan and bake in  preheated oven for 30 minutes or until the top of the brownies are crisp and the edges begin to pull away from the pan.(The insides will be soft to the touch)  Cool in pan on a wire rack.  Can be frosted if desired, but equally delicious alone.


Chocolate Cream cheese frosting:
8 oz. Cream cheese
4 oz. butter
2 C. Powdered sugar
1/4 C. Cocoa powder
1/4 C. Whipping cream


With an electric mixer, mix all ingredients until the consistency of frosting.  Spread over cooled brownies and serve.
Reblog this post [with Zemanta]


chicken ala king
I love Chicken ala king, but with its white sauce and biscuits it can be an unfriendly meal for those who are gluten intolerant.  I made it a goal to come up with a gluten free version that would taste as good as mom used to make.  Thankfully, we had recently come up with a recipe for baking powder biscuits, so now all I needed to do was come up with a tasty, gluten free white sauce.  I took a typical white sauce and just replaced the flour with corn starch.  The result was a very tasty sauce that I even ate cold the next day.

2 TBSP butter
1 can Mushroom pieces ( use fresh if you have any on hand)
Reserved liquid from mushrooms
1/2 Red pepper, diced
2 TBSP Cornstarch
2C.  Milk
1/2 tsp. Basil
1/2 tsp Thyme
Salt and pepper to taste
2 C. Chicken, cooked and cubed
1/2 C. Peas, frozen
2 egg yolks.
Parmesan cheese
Baking powder biscuits


In a medium sauce pan, saute, over medium heat, mushrooms and peppers in butter.  Stir in cornstarch and cook for 1 minutes.  Slowly add the reserved mushroom liquid and milk.  Add chicken and spices.  Bring to a boil and simmer until slightly thickened.  Add peas and egg.  Cook until peas are tender.  Serve over baking powder biscuits.  Garnish with Parmesean cheese.
Reblog this post [with Zemanta]


Mr. Bean and his family
Image by he_boden via Flickr
As I sit pondering what recipe to write, our little neck of the woods is under the seasons first large snow storm, blizzard warnings and everything. What better food to eat and watch the snow falling, than a hearty winter soup. One of my families favorite is Calico Bean Soup. We make it frequently in the fall and winter months. It is a comfort food. It is filled with highly nutritious legumes and tomatoes and is a really great whole food to offer to your family. This recipe will take a little advanced planning, as the beans must be soaked overnight and cooked before you can add any tomatoes. The acidity in the tomatoes will prevent the beans from becoming soft if they are not already cooked. I have made this recipe with a variety of meat; turkey ham, ham, prosciutto, pancetta, and homemade Italian beef sausage. They are all wonderful variations and I make according to my cravings at the time. I try to buy natural, organic and uncured meats whenever possible to avoid the cancer causing nitrates and nitrites. I also make sure their are no gluten fillers or MSG added. Since this can be expensive, I use a small amount to add a little flavor and make the soup mostly of vegetables. I use a 11 or 13 bean mix, but I have seen anything from 7-13 bean mixes. Use what fits your preferences. This recipe can be made in a crock pot as well, but the beans must be cooked to the point of being tender before adding to the crock pot.

3 C. 11 Bean mix
2 TBSP. Salt.
2 quarts Water or vegetable stock.
2 Bay leaves
1 pkg. Pancetta (about 1 C. diced meat)
1 Onion, diced
16 oz. Canned tomatoes
1 Red pepper (optional)
1tsp. Chili powder
1 tsp. Lemon juice
2 cloves Garlic, minced
salt and pepper to taste

Wash beans thoroughly. Place in a kettle and cover with water and 2 TBSP salt. Soak over night or for 8 hours.
Drain beans, add 2 quarts of water, meat, and bay leaves. Bring to a boil and simmer slowly for 2-3 hours, until beans are tender. Add the rest of the ingredients and simmer for another 30 minutes. Serve immediately. You may garnish with Parmesan and/or sour cream.
Reblog this post [with Zemanta]


The full mushroom assortment at Harrod'sImage by randomduck via Flickr
Having lived the challenge of gluten free and MSG free for a year now, I have come to realize that the best way to avoid products with these ingredients is to make them myself.  Cream of Mushroom soup is especially difficult to find without both of these ingredients.  I have found that making my own is not as hard as I thought it would be and is definately much tastier.  I found the original recipe in the Soup Bible, but it was not gluten free.  So I converted it to gluten free as well as a few other alterations to make this wonderfully simple soup that can be used as a base for a casserole or eaten plain.  I make mine in bulk and freeze, so it can be just as convienient as pulling a can off he shelf but much more nutritious and with no worries about what is in it. 
I use a mixture of mushrooms, but you can use just white button mushrooms.  With the white mushrooms, you will get a milder mushroom flavor and a white soup.  A mixture of mushrooms, will give you a more robust mushroom flavor and a darker soup.
I also use coconut oil instead of sunflower oil, which the original recipe uses, because coconut oil is a much healthier oil.  It is full of vitamins as well as healthy fatty acids. I do still use the butter they call for in the recipe because there is nothing that can replace the flavor of butter.  Butter is natural too and I will always go for natural over synthetic products like margarine.
The original recipe does not use garlic, so you can make it without if you do not like garlic.  I love garlic.  Luckily, garlic is extremely good for you too.  You can increase the amount of light cream to make a richer soup, but I like to keep it as it is written.

10 oz. Mixed mushrooms (white button, cremini, portobello)
1 TBSP Coconut oil
3 TBSP Butter
1 Onion, minced
1 TBSP Corn Starch
2 C. Vegetable stock (I use organic gluten free)
2C. Milk (I use organic whole milk)
a pinch Dried Basil
Salt and freshly ground pepper to taste
2 Cloves Garlic, pressed
2-3 Tbsp Light cream

Separate the mushroom caps from their stems.  Slice the caps finely and mince the stems.
 Heat the oil and the butter in a heavy bottomed saucepan.  Add onions and mushrooms.  Fry for about 1-2 minutes and then put the lid on the pan and sweat for 6-7 minutes.  Half way through the sweating process, add the pressed garlic.  Stir occassionally. 
Stir in the corn starch and cook for about 1 minute.  Gradually add the stock and milk to make a thin, smooth sauce.  Add the basil and season to taste.
Bring the soup to a boil and simmer for 15 minutes.  You will want to keep it partially covered to keep it from boiling over.
Cool the soup slightly, then pour into a blender or food processor and blend unitl smooth.  If you are eating this immediately, add the cream and any fresh basil for garnish.  If you are going to store, pour into hot sterilized jars leaving an inch at the top.  Put a lid that has been boiled on and its ring and stick jar in the freezer.  The hot soup will vacuum pack the jar with the rapid cooling in the freezer.  Use within 6 months.
Reblog this post [with Zemanta]


Kokusnuss, in Hälften gebrochen; Coconut, brok...Image via Wikipedia
Amazingly my kids actually like fish, which is really a good thing.  We try to eat fish at least once a week to get the healthy fats in them.  We try to find wild caught, as many fish farms feed their fish corn and other grains which could create a problem for those who are gluten free.  They also dump a lot of antibiotics and growth hormones in the water to help keep diseases down created by the small living space and to grow them faster to make more money.   Since I created this recipe, I have found it very difficult to find wild caught Talapia, so I use it on any wild caught fish we can find at the market. It is very simple but has tremendous flavor.

1 1/2 C. Coconut flour
1/2 C. Coconut, shredded
1 egg
8-16 oz. Cocnut milk
Salt and pepper to taste
Fish Fillets
Coconut oil for frying

In a large bowl or flat dish, mix coconut flour, shredded coconut, salt and pepper.  In another bowl, mix coconut milk (start with 8oz and add more as needed) and the egg.  Heat oil in a frying pan.  If you like a thicker coating,  dredge the fish in the egg mixture then in the flour mixture, let then sit a few minutes and repeat the dredging.  For a lighter coating just dredge once.  Place the fish in the heated oil and fry until golden brown.  Serve immediately.  An excellent accompaniment would be coconut jasmin rice.
Reblog this post [with Zemanta]


Late fall is the season for Pomegranates.  I love them, but the season is way too short! The little bursts of sweetness and crunchiness wakes the mouth with each handful.  Here is a recipe that uses this wonderful fruit and many others to give you a healthy dose of vitamins and anti-oxidants. Fruit Soup is also a raw meal for those who are living that lifestyle. It incorporates avacodoes in a way that kids won't even know they are there, providing important healthy fats.  You can use a variety of berries.  I prefer to use the most variety putting in blueberries, strawberries, raspberries, and blackberries, but you can also make it with just one or two of these types.  This makes an awesome breakfast or a light meal.


2 Bananas, sliced
2 Apples, diced
1 Avocado, diced
1/2 C. Dates, diced
2 Kiwi, diced
1C. Strawberries, diced
1 Pineapple, diced
1 Pomegranate, use seeds only
1-2 C. Berries of your choice
2C. Orange juice
2/3 C. Lemon juice
1C. Dates, chopped
1 1/4 C. Frozen berries of your choice

In a serving bowl, combine bananas, apple, avocado, dates, kiwi, strawberry, pineapple, pomegranate seeds, and other berries.  Set aside.  In a blender, combine orange juice, lemon juice, dates, and frozen berries.  Blend until frozen fruit make a sauce that hasw a creamy consistency.  Pour blended fruits over bowl of diced fruit and serve immediately.
Reblog this post [with Zemanta]


Pumpkin Cheesecake

Image by Daremoshiranai via Flickr


For Thanksgiving this year, my family had a potluck dinner.  My family is the only one that is gluten free on purpose, so I wanted to make a dessert that used traditional foods but was also gluten free.  I decided to make a pumpkin cheesecake.

The cheesecake part is really easy to make gluten free as most cheesecakes don't use gluten, but the crust was a challenge.  The perfect compliment to a cheesecake is a graham cracker crust.  This obviously wouldn't work for us.  I looked on the internet for a gluten free crust and sifted through many recipes.  I finally came up one that I thought would work out nicely.  I found it at Karina's Kitchen.  It worked out well. 

The Pumpkin cheesecake recipe I used originated at Celiac.com .  I used my homemade yogurt which was not non-fat( made with organic whole milk) and pumpkin puree from pumpkins out of my garden.  The problem that arose from using my puree is that is was too wet.  I should have let it sit in a strainer for a while to drain off some of the juice.  The cheesecake was delicious, but the pumpkin juices made the crust caramelize and leak all over the counter.  Everyone seemed to enjoy it, including those who are not gluten free. Even a few who don't like pumpkin gave it two thumbs up.

Almond Pie Crust

2 cups (heaping) almond meal
1/2 cup butter/vegan stick margarine, melted, or 1/2 cup light olive oil
2/3 cup brown sugar
1/2 teaspoon almond or vanilla extract
Dash of pie spice or cinnamon, if desired

Combine all of the ingredients to form a sticky dough. With moist fingertips, press the dough into a greased 9x12-inch baking pan or 2 8-inch glass pie plates. Bake the crust at 350 degrees F. for 20 minutes. Allow to cool completely before filling.

I've done the same with pecans; I've processed them into meal - pecans make a wonderful nut crust. Some cooks add a little rice flour to the mix. Experiment.


Pumpkin Cheesecake

2/3 cup non-fat plain yogurt
2 (8 oz) packages light cream cheese softened
1 ¾ cups canned pumpkin
2 eggs
½ cup sugar
½ cup brown sugar
1 ½ cups nonfat evaporated milk
2 teaspoon ground cinnamon
¼ teaspoon ground cloves
1 teaspoon ground ginger
1/8 teaspoon salt
1 teaspoon vanilla


In a medium bowl, beat yogurt and cream cheese until creamy. In a separate bowl, combine remaining filling ingredients and beat until creamy. Stir into cream cheese mixture and beat until well mixed and creamy. Pour filling into crust and bake for 2 hours, or until middle slightly jiggles when tapped.


Cool on rack, and then cool in refrigerator at least 4 hours before serving. Garnish with whipped topping and a sprinkle of cinnamon (optional)


Reblog this post [with Zemanta]